Tuesday, 29 September 2009

Customising alignment label styles

We just sent our deliverables for the outline design stage of a road renewal scheme I was working on the past few months out the door last Friday. This week should be a quieter one that I can probably squeeze in a post or two during lunchtimes before the next stage kicks off next week!

Before I start on the main topic, a quick note that Civil 3D 2010 Update 2 have been released and can be downloaded here.  As usual, it is recommended to read the Readme file prior to installing.

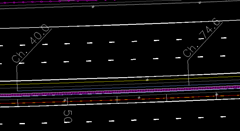
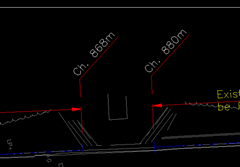
OK, here’s another post on customising alignment labels styles. This is my stab at creating an alignment style similar to the image below.

Label

Alignment labels can be created/edited through the Settings tab in Toolspace or through the Add labels dialog box; Alignment>Add alignment labels. I often do the latter.

Labels-fixed_point

Create a new label style and name it Chainage (or Station).

Labels-new

On the General tab, change the Orientation reference to Object.  This will ensure that the extension line of the label will always be perpendicular to the alignment.

Labels-view

I will be creating 3 components. 1 line for the extension from the label point, another line for the landing and a text for the chainage number.

Click on the Layout tab and delete any existing component.

First create a new text component.

Labels-text_new

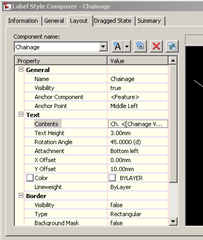
Add the Chainage value field to the text contents and use the parameters as below.

Labels-text1

Then create the line for the extension from the label point with parameters as below.  I have Line.1 as component name (this is the default that Civil 3D creates) but this can be changed to a more sensible name anytime.

Labels-line1_newLabels-line1_props

Next is to create the landing (the line below the text) with parameters as below.

Labels-line2_props

To create a label below the alignment, copy the style previously created. On the Layout tab, change the rotation angle to 315 and Y-offset to -10 of the chainage text component.

Labels-bottom_props

Here’s how the labels look like above the alignment.

Label-final1

And here it is below the alignment.

Label-final2

Hope this helps or at least gives ideas on how to create and customise alignment label styles.
Saturday, 22 August 2009

Autodesk Civil Engineering Curriculum 2010 Videos

Just noticed a series of educational videos from the Autodesk channel on Youtube.   There are a total of 29 videos grouped into units and a number of lessons in each unit.

“These videos support the Autodesk Civil Engineering curriculum and help to demonstrate engineering concepts using the Autodesk portfolio. To view the entire curriculum, including Instructor Guides and Student Workbooks, visit the Autodesk Student Community. www.autodesk.com/edcommunity

I posted below the links to each lesson.  Enjoy!

Unit 1: Autocad Civil 3D 2010 Environment

Lesson 1: Drawing environment

Lesson 2: Civil 3D user interface

Lesson 3: Settings and Styles

Unit 2: Create Ground Data

Lesson 1: Create Survey Data

Lesson 2: Create Points

Lesson 3: Surfaces

Lesson 4: Insert Images

Unit 3: Land Development

Lesson 1: Grading

Lesson 2: Create Parcels

Lesson 3: Horizontal Alignments

Lesson 4: Profiles

Lesson 5: Assemblies and Corridors

Lesson 6: Cross Sections and Quantities

Lesson 7: Site Grading and Quantities

Lesson 8: Pipe Design

Unit 4: Environmental Design

Lesson 1: Sustainable Design

Lesson 2: Watershed Analysis

Lesson 3: Pipe Design

Lesson 4: Integrating Architectural and Site Design

Unit 5: Transportation Design

Lesson 1: Alignments

Lesson 2: Profiles

Lesson 3: Roadway Assemblies and Corridors

Lesson 4: Cross Sections and Quantities

Lesson 5: Plan Production

Unit 6: Geospatial

Lesson 1: Using Geospatial Data

Lesson 2: Geodetics

Lesson 3: Queries

Lesson 4: Cartography

Lesson 5: Spatial Analysis

Monday, 3 August 2009

Civil 3D 2010 Update 1 now available

Update can be downloaded here.  Remember to read the Readme file for installation instructions and to see what issues were resolved by this update. 

Surface editing using OOPS

We normally receive topographical surveys as 3D polylines and blocks which we use to create a Civil 3D existing ground surface model. 

The 3D cad drawings are at times not layered properly that I would wrongly define polylines I don’t need such as bridge soffits, overhead cables and any other polylines that could mess up the surface model.  Below is an example where the overhead cables were included in the breakline surface definition.  

 Overheads

A quick way to amend the surface model without deleting the polyline is to use the OOPS command.  The OOPS command restores objects erased by the last ERASE command.

Delete the overhead cable polylines using the normal ERASE followed by the OOPS command and rebuild the surface.  This will remove the overhead cable polyline from the surface definition but retaining it in the drawing. 

Overheads_after

Thursday, 25 June 2009

Surface editing using section line data

Before I start on the above post, just to remind that a hotfix for Civil 3D 2009 have been released to resolve section display and volume calculation issues.  Hotfix and installation instructions can be found here.

Now to the main topic.  We were recently asked to compute earthworks volume quantities of different geological materials for a 5km highway scheme.

Ground investigation data in spreadsheet were provided, import them in to Civil 3D using points, create a surface and cut sections to see how the materials look- no problem.

However due to the distance between borehole locations, the data is not sufficient to correctly model the surface of the underlying material.  On the section shown below, the unsuitable material layer in some chainages are above the existing ground.

Section_01

This will obviously generate erroneous volume quantities.  I thought of two ways to do this.  First, is to edit the surface by adding points along the sample lines with the correct levels either by adding COGO points or surface points.

Another way is to edit the section, copy and paste the section data to a spreadsheet and import them back.  We preferred to use this option as we have these instances on a couple of sections.  Here's how we did it using Civil 3D 2008.

Change all the material's section lines to static. Right click a sample line> Sample Line Group Properties.

SL-RC

In the Sections tab, change the material's update mode to Static and click OK.

SLGP

This should enable the section line grips.

Grips

Grip edit the section. 

Grip edit

After editing the section, right click the section line> Edit section. Right click the table, click Copy All. 

Edit section_copy

Paste the copied table on a spreadsheet.  Continue editing the section lines for the other chainages and adding section data to the spreadsheet as you go along.

On the spreadsheet, delete the Section Gradient In and Out columns and the header row.

SS_01

Replace the point number column with the chainage number where the section was taken from and remove the unit "m" from the values using the replace command in Excel.  Save as a comma delimited (.csv) file format.

SS_02

Import the file to Civil 3D.  Points menu> Create Points - Alignments> Import from file.

Import from file

Note that the file type it will look for is .txt.  Type *.csv in the File name field to see the file.

SS_03

When asked for a file format, choose '2' - Chainage, Offset, Level.

IF_01 

Choose ‘2’ – Comma for delimiter type and hit Enter for the next two prompts.

IF_02

Select the alignment and the points should appear along the section sample line.

IF_03

Create a new surface and use all the project points (existing and added).  I’ll leave the volume calcs to you. smile_teeth

Sunday, 21 June 2009

Update 3 and Skill Builders

It is a bit late I know but might still be of use to some. Autocad Civil 3D 2009 Update 3 was released a few weeks ago. This fixes problems and issues on some Autocad features. Update 2.1 is a prerequisite and remember to read the ReadMe document.

I also noticed two new skill builders for Civil 3D 2010 from the Support page.

I particularly like the dynamic GENIO data link to Civil 3D workflow. We also use Bentley MX at work and this can promote collaboration between our MX and C3D users.

Wednesday, 3 June 2009

Rename command

A colleague asked me yesterday how to rename an Autocad block. To do this, I normally explode the block, create a new one with the desired name and purge the old block.

I just discovered the RENAME command in the Autodesk discussion forum.

Not only can it change block names but also Dim styles, Layers, Mleader styles, Linetypes, etc.

Monday, 18 May 2009

Autodesk Design Review - GPS Mode demo

A colleague and the company's Autodesk Design Review guru Trevor Gallyot prepared a video testing ADR's GPS interface feature. 

It is quite a useful feature when doing field visits, reconnaissance surveys and dealing with a complex, evolving site.  A proposed infrastructure footprint can be laid down, making it easier to imagine the impact while walking the site at eye level.

Civil 3D was used to import Google images and publish to ADR.

Tuesday, 5 May 2009

Vote for Sessions for AU 2009

I received an email yesterday from Autodesk University Online announcing that voting for the classes you want to see for AU 2009 is now open.

AU 2009 will be held from December 1-4 at the Mandalay Bay Hotel in Las Vegas, NV.

To vote for sessions, go to the Autodesk University Session Selection page and log in using your AU Online username and password. If you do not have an AU Online account, it only takes 15 seconds to register as an AU Online member. You can vote up to 20 classes from the list of submitted classes. The voting deadline is Friday, May 8 at midnight PDT.

Even if you can not attend, I still encourage voting the ones you want as most class handouts, podcasts, screencasts and presentation documents are made available on the AU website after the event to members to download.

Friday, 1 May 2009

Transition curves

To automatically include transition curves using the Straight-Straight (With curves) command, the Transition In and Out option in the Curve and Transition settings should be enabled. These are unticked by default. Once set, this will be applied to any new alignment created.


This can also be set through the alignment command settings. Toolspace (Settings tab)> Alignments> Commands> Right click CreateAlignmentLayout.


These are drawing specific settings and need to be set every time on new drawings.

Sunday, 19 April 2009

Autocad Civil 3D 2010 UK version now available

For all UK and Ireland users who are under subscription, the UKIE version of Autocad Civil 3D 2010 is now available to download from the Autodesk subscription site. Here's bits of reminders to help you get started.

If you opt to download your copy from the subscription site, I suggest you install and use the Autodesk Download Manager for quicker downloads and ability to pause/resume. Otherwise, you can always request for the DVDs.


When you get to the download page, you'll see 6 files available but you only need the 3 UK files. The other 3 are US English versions.


After installation, be sure to read the Readme document. I must admit, I sometimes ignore this document (too eager to use the software!). It contains important information for this release.


When you start Civil 3D, you'll be greeted by a welcome screen that contains links to the usual documentations and the new getting started videos which I think are great additions. Some like myself learn a lot quicker through visual than reading materials. At the start of the video, it says “No Audio” (though I can hear the cursor click sound) but have texts to guide you through the videos.

The User Interface Overview will help you find your way around the new interface. This can also be accessed through the Infocenter toolbar.


And don't forget the new features workshop. It can now be accessed in the Infocentre toolbar. “Old” new features for 2008 and 2009 are also available to view in case you skipped any of these releases.


Lastly, download and view Jack Strongitharm's powerpoint presentation on the 2010 UKIE country kit. It discusses installation notes, known limitations, country kit documentation and new contents and reports.

Happy downloading!

Thursday, 16 April 2009

Civil 3D 2010 Profile Object Projection

You might already be aware through other Civil 3D blogs the new feature in 2010 - the ability to project objects in plan onto profiles and sections. These objects can be Autocad points, solids, 3d polylines, blocks, MV blocks or Civil 3D points.


One area of application that I see this new feature will be useful is in placing geotechnical investigation boreholes on long sections.

I've tried it on one of our past highway project and used dynamic borehole stick blocks.


This of course won’t do all the work as the dynamic blocks need to be inserted and grip edited manually but will help cut a significant amount of draughting time.

Thursday, 2 April 2009

UK Civil 3D User Group Meeting

Just a quick reminder that the next UK Civil 3D User Group organised by Excitech Ltd will be held on 21 April 2009 at their head office in Enfield, North London.

This is a good opportunity to meet other users, discuss and share information related to Civil 3D. To register and get more details, visit their Civil 3D User Group site.

Tuesday, 24 March 2009

Creating dynamic borehole blocks

Placing geotechnical investigation borehole "sticks" on long sections is a tedious and time consuming work. Here's how to create dynamic borehole blocks to help speed up the task.

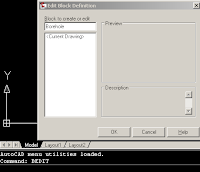
1. Type BEDIT and type a block name and click OK.


2. Draw the borehole stick using lines and move it to 0,0 coordinates using the midpoint of the top line as base point.

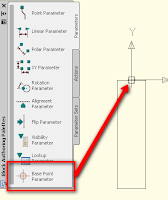
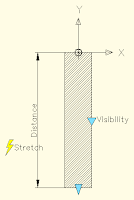
3. Insert a Base Point parameter at the mid point top line.


4. Place a Visibility parameter at the mid point of the right line.

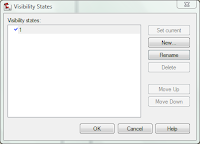
5. Double click the yellow exclamation point symbol. Change the visibility state to '1'.


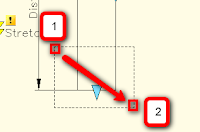
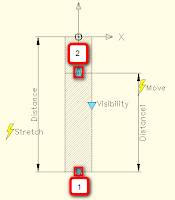
6. In the Parameter Sets tab, place a Linear Stretch parameter picking the midpoint of the top line first and the midpoint of the bottom line as the second point. Double click the Stretch Action yellow symbol. Specify the first corner of the stretch frame and objects to stretch. The image below shows where to pick the first and second corner of the stretch frame.


7. Hatch the borehole. That's one layer of borehole done!


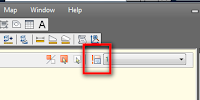
8. Now to create another layer. Double click the Visibility parameter or click the Visibility State button on the block editor bar and click new and name it '2'.


9. Select and right click the hatch object> Object Visibility> Hide for Current State. The hatch will be greyed out which means it won't be shown for the new state.

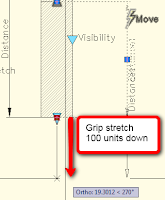
10. Draw a horizontal line across from the left line to the right. Place a Linear Move parameter set with start point at the midpoint of the base and midpoint of the new line as the second point. Double click on the Move Action yellow symbol and select the new line. Click the Distance1 parameter and grip stretch 100 (or more) units down. This means the line can be moved down 100 units from its current position. This can be increased if need be.


11. Create hatches for the 2 layers. Hatch for the upper layer should be the same as the hatch for State '1' and any hatch for the bottom layer.

12. Repeat Steps 8 – 11 to create more layers.

13. Save the block definition and close the block editor.

Additional options and settings can be added through the parameter’s properties.

Click here to see how it works.

If you'd like a copy of the drawing I used to play with, just drop me an email. harold dot alberto at gmail dot com.