Friday, 20 March 2009

Google UK Street View now live

Here's a list of UK cities on Street View at present.

Aberdeen
Belfast
Birmingham
Bradford
Bristol
Cambridge
Cardiff
Coventry
Derby
Dundee
Edinburgh
Glasgow
Leeds
Liverpool
London
Oxford
Manchester
Newcastle
Norwich
Nottingham
Scunthorpe
Sheffield
Southampton
Swansea
York

Click here to see where I am on weekdays using Civil 3D.

Friday, 13 March 2009

Profile view level datum text

At work, we normally place a level datum text for long sections as shown below.


This can be achieved in 2 ways.

1. Using the Left Axis title text.

If you don’t need to show the axis title text on your profile, you can use this for the datum label.


Right-click on the profile and click Edit Profile View Style> Title Annotation tab. Pick the Left axis title text radio button and click the Title text “A” button. Delete any words in the text window, choose the “Profile View Minimum Level” property field from the pull down list and click the blue arrow. Add “Datum” and “mAOD” to the text and click OK.


Back to the Profile View Style box, change the Axis title text parameters as per image below. This is ideal if you need to add the datum text onto several profile views.


2. Using the profile view labels.

Copy an existing profile view label. In my case, I’ll copy the chainage and level style.


In the Information tab, change the style name to Datum. In the Layout tab, change the component’s name to Datum. Activate and click on the text component editor button. Delete the chainage value text in the text window leaving the Profile View Point Level text in and add “Datum” and “mAOD” to the text and click OK.


Change the Label Style parameters as on the image below and label the profile view.


Note that the labels won’t update if the level range is changed.

In my next few posts, I'll show how to create dynamic borehole "sticks".

Sunday, 8 March 2009

AUGI Civil 3D wish list voting - have your say!

Just a quick reminder that the Autodesk User Group International (AUGI) Civil 3D wishlist ballots for the 2011 release are now open.

All you need to do is to login (or register to become a member) and review the submitted wishes and rank the votes from 1 to 10 where 1 as the most preferred. But hurry as it is only open until 15 March 2009.

Aside from Civil 3D, there are also wishlist ballots for Autocad, Inventor, Revit Architecture. So if you have colleagues or know someone who uses these softwares, please pass this on.

If you have a wish that isn't in the list, you can still submit them in the Civil 3D wishes discussion group.

Sunday, 1 March 2009

Traffic management using Civil 3D labels - Part 3

Now for the labelling part. I suggest placing the labels in layout tab inside the viewport (model).

Alignments menu> Add alignments labels> Add alignments labels...> Label type: Chainage Offset – Fixed Point> Select the 610-Right style and click Add. Follow the prompts in the command line and drag the label to desired location using the drag label grip.


If the signs come in too big or small, go back to the label style composer and adjust the block height. If the text labels clash with or are too far from the sign, go back to the label style composer and adjust the X-offset.

To create a label style showing the sign at the left side of the leader, copy 610-Right and change the style name to the 610-Left. In the Layout tab, change the block attachment to 'Bottom Centre'.


If you have colleagues working on the same scheme, you can share label styles by copying theirs to your drawing and vice versa. Open their drawing as 'Read Only' to be sure you don't make any accidental changes to it. In Toolspace-Settings tab-Master view> Alignment> Label Styles> Chainage Offset> drag and drop the styles you need to your drawing.

Hope this helps and gives you ideas of other possible applications of this versatile Civil 3D feature in your everyday work tasks.

Traffic management using Civil 3D labels - Part 2

In the Layout tab, delete any existing component and make a new Block component. Change the name to 610 and anchor point to ‘Middle Center’. Click on the Block name’s value cell once to activate the Select block button. Click the button and choose the required sign block. Change the rotation angle to 90 and attachment to ‘Top Centre’.
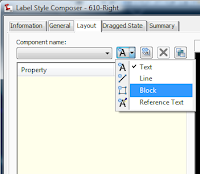
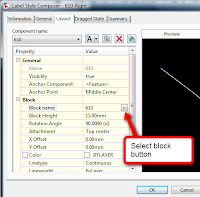

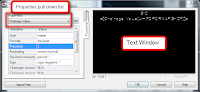
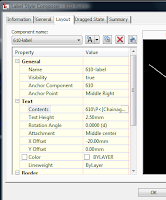
Create a new text component and rename to ‘610-label’. In contents, activate and click the text component editor button. Type in ‘610’ in the edit window. Choose ‘Chainage Value’ in the properties pull-down list and change the format to decimal and precision to 1 and finally click the blue arrow button to bring the chainage value property into the text window and click OK. Back to the label style composer window, change the text attachment to ‘Middle center’ and X Offset to -20.

In the Dragged State tab, change the dragged state component display to ‘As Composed’. In the General tab, change the orientation reference to ‘View’ and flip anchor with text to ‘True’. Click OK.